Sunday, November 20, 2011

We've Come a Long Way, Baby


So this whole, 'I'm going to take a year hiatus from my blog' thing was totally not intentional...and in no way means I was not crafting up a storm. I have so much to show you! I'll work my way up to the most recent! 


First, I made a fantastic cowl out of this incredible RED, varied thickness yarn. I used an interesting pattern that looks like hearts in my opinion;


(almost done)

(done!)

(close-up on the button! love!)

Next, I worked on  a hand-made frame for my Lady Sovereign poster that I stole from her show at the Doug Fir; and I'll throw in some pictures of another one I've made since for yet another stolen poster of my favorite band, 'Margot and the Nuclear So and Sos'!

(Materials: Thin cardboard, awesomely patterned tissue box, 
electrical tape, and stick glue, super simple, right??)

(finished product! Excuse the part that is falling off, it's been awhile since I made it)

(Margot! Materials: thin cardboard, electrical tape, and wood-grain printed ribbon!)

Oooh! Bonus! Here's another picture that I custom-framed! Yaaay!
(Note: I saved this copy of The Stranger for 2 1/2 years. That is how much I love this picture.)

(Materials: Flat canvas, picture, electrical tape, saran wrap 
(due to the lack of shine on the newsprint), and stick glue)

As a part of being exceedingly busy, I picked up a new hobby, Burlesque. Now, I had no idea how much crafting was involved in this form of entertainment. It's A LOT. Costuming is incredible, especially when there is so much glitter/sequins involved. Here's my first costume; 

(Materials: Bra from H&M, pink string of sequins, black-beaded fringe, elastic pink sequin, black frilly unders, hot glue, aaand an entire season of Jersey Shore)

Aaand here is a little look at my second costume, which is not complete, but getting there!

(Hope it's not vulgar that I'm wearing it in the picture...it's the best picture I got of the product of my hard work! (that didn't sound conceited at all, I'm sure) 
Materials: Houndstooth silky fabric, green sequins, silver ribbons, 
hot glue, and silver band for the middle.)

Well I think I've rattled on for long enough, so I will leave you with the picture of the first Mykal-Made Pie ever! 

(turned out great, but I didn't have enough crust to make a top one, thus, the heart!)

That's all I got for today, but I will try and do this weekly from now on! As you've probably noticed, I've changed the look a little bit, and I want to give a nod to the inspirational woman who designed the print on the background, Melinda Josie, there is a link to her website on here, there, you can order awesome fabrics and prints of her art. So great. 

Hope you've enjoyed catching up with me! Because I sure loved telling you about all of my creative endeavors! 

-Mykal 


Thursday, October 14, 2010

Collagey Coaster Can't Hold Water

Hello all!

I have been knitting up a storm, but I am still fiddling with my lame-o camera to take a quality photo of the finished work!

In the meantime, here's something I finished awhile ago.

A few months ago, I was helping clean out the storage shelves at my work, and happened upon so awesome glazed ceramic tiles. I was immediately inspired to make some collagey (not really a word, but whatevs) coasters. Here's the first one I made for my friend Nicholas.


Nicholas is really into the outdoors and cycling so I decided to take these facts and run with them. I collaged the background with a glue stick and magazine pictures. I then found a gear silhouette online, printed it, and covered it with electrical tape, cut it out and glued it on top. I wrapped the ugly white edge with black ribbon, and then proceeded on my mission to find the best collage sealant around.


I think it's pretty important for a coaster to be waterproof, don't you? I asked at Joann's (clueless), and Collage (a fantastic store in Portland, much more helpful), they offered their best advice, and I walked away with supposedly the best sealing spray...not so much. I added layer after layer, sprayed it once in the morning, once at night, and hoping it was safe, delivered it to Nick. Sadly, Nick reported back soon after that it was rippling under increased moisture, which caused an understandable stream of obscenity.
I'm still proud of it as a work of art...but I would have loved it if it could have been functional art. While discouraging, this project has inspired me to look into working with resin, and other nifty (not to mention waterproof!) mediums.

On a personal note, loving Portland, I think it was meant to be.

Will post the new knits soon!

Love Y'all
-Mykal

Monday, October 4, 2010

A gift for a baby

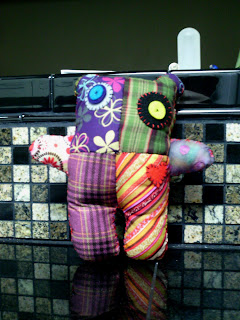
My older sister is having a baby in the next few days. A girl named Sandra Lynn. So this crazy bear/monster doll is intended for her love and usage.


(Post-face which is made of felt, pre-stuffing.)
(The back.)


(The front!)
-Kendra

Tuesday, September 21, 2010

Green Man


I've been fascinated with masks since I was in the 7th grade. Once upon a time, I was a part of a mask ensemble at school and since then they've always been my favorite way to work in theatre. Recently, I'd had an itch to make a half-mask and decided that I'd make one depicting a green man/woman. To find out more about the history of the Green Man, please feel free to begin your search here.

So I was sitting in my house thinking, "Well great. To make a mask, it tends to require clay and paper mache. Neither of which I have lying around."

To the second: Flour and water works. Recipes abound on the internet. (Beware of the smell.)

To the first: Oh yeah. I just happen to have a ceramic mold of my face lying around from a stage makeup class.


Fancy that
So Vaseline was applied to the ceramic part and then covered with a plastic bag. From there, it was a lot of cutting up and applying pieces of newspaper, shaping, and then letting sit.
After everything was dry, there was cutting of the eye holes and the cutting/shaping of the edges around it. Sanding down smooth. Reapplying a layer of paper mache around the edges on the outside and around the edges of the eyeholes. I applied artificial leaves and then let sit another while. Painting (with acrylic paint) and the cutting of the holes for the elastic band happened after. You've seen the outside of the mask, this is the inside:

(My camera gave up the ghost after Ireland, so these are taken with a webcam. I'll repost these after I acquire a new picture-taking device, I promise. This looks way cooler in real life.)
There is another mask in progress, so I'll be around!
-Kendra

Friday, September 10, 2010

Annie Get Your Garter!

Hey there! Ho' there! How do ya do?

Sorry, had to. Anywho, as I briefly mentioned in my last post, my friend Mikki recently got hitched (sweetest couple ever). I didn't really realize how many parties were involved in the whole wedding thing, but first there was the bridal shower. The theme of said party was Leather and Lace, now, I tried to follow these guidelines when it came to my dress, and failed. But when it came to the gift, I couldn't think of anything better than a custom garter, a bottle of wine, and a shot glass presenting several phallic images, but I digress...here's the garter:


I didn't make the original garter (although I intend to dabble in creating them myself), which is the silky black under-layer seen here, I bought that and the plastic guns at a quirky little store on Hawthorne in Portland called, Naked City. The garter cost about $3 and the guns were 20 cents each. When I got home, I surveyed my ribbon collection and decided to make a trip to Michaels, where I found the awesome sparkly, black ribbon (from the halloween collection).


I then attached the ribbon and 3 guns with black embroidery floss, and I think I ended up with a pretty awesome gift! I want to make tons of these now!

I just got a job in Portland, so I hope it doesn't impede on my creativity too much, but it will fund it...so that sounds like a deal :)

Thanks for visiting! Come back and see us soon ya' hear?


Monday, September 6, 2010

A Poem From Me To You


I am a great bear full of style and grace

With well trimmed claws and fur on my face

And unlike the others that are of my kin,

It's truly the waltz that brings out my grin.

Eating and sleeping or smoking cigars

Is nothing to dancing 'neath wild, bright stars!

Sure you are small with your gold, curly hair

And I am a scruffy and rather large bear

But you, my dear girl, are as lovely as ever,

And I'd dance with you here, from now to forever.

So you wear your dress, and I my large tux.

I'll meet you at dusk by the pond with the ducks.

We'll laugh and prance and sing and sway-

A bear and a girl, in the whimsy way.


(Art by Emily Martin)

At the moment, I am working. It's a 24 hour live-in caregiver position, so I'm not finding a lot of time to craft. But I've made a list for the upcoming school year and am looking forward to getting started on them once fall is around. Until then, I hope you enjoy the poem!
-Kendra

Cowl at the Moon


Who knitted an entire cowl last night?? *Points at self* This gal right here!

At about 5:30 last night I decided to partake in some knitting therapy. Had a busy weekend, friend's wedding, so much driving, hardly any sleep. So, I decided on a movie; The King of Kong: A Fistful of Quarters, about the world champion of Donkey Kong, and got out the super chunky black tweed I bought a few weeks ago.
I am a sucker for tweed in general, but this stuff was special, not only was it black, but the beautiful flecks of color (the signature of tweeds) were rainbow. There are few things I love more than rainbows, but one of them is knitting. So, the fact that I could combine the two was pretty gosh-darn satisfying. Even more satisfying is the fact I finished a cowl in about 4 hours, with breaks, a girls gotta eat. Here it is...


Please excuse the sub-par quality of the picture, as my camera (I have recently discovered) is a piece of trash, and I decided to take this photo on my laptop's camera.

I knitted this cowl like a scarf, experimenting, and knit every row until it was big enough to fit around my neck and not strangle me, then I switched to a simple rib-stitch, knit 2, purl 2, and cast it off after about an inch and a half. I then took the tail from the cast-on edge and used it to sew the two pieces together. The buttons are just for show, but they sure are cute, aren't they?

Really excited to get some use out of this, I'll try and knit a sweater to match it tonight or something (not really).

Until next post, Byeee!